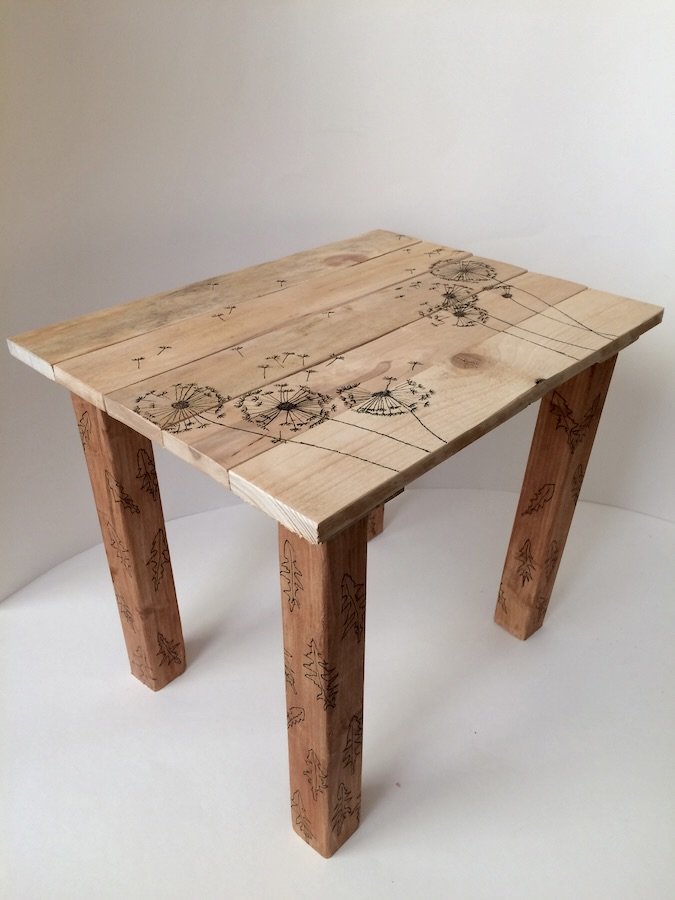
Perfect for little ones, this DIY guide is sure to come in handy, whether to have it function as a little bench, or a small table to colour on.
Level of Difficulty: Medium
Materials:
- 4x4cm timber total length: 150cm (this will allow some room for error)
- 20 wooden dowels 6x30mm
- 16 wooden dowels 8x40mm
- Oak or pine wooden boards
Minimum depth: 1.5cm, width: 6.5cm, total length: 300cm (this will be cut down into seven boards and will allow some room for error).
- Polyurethane varnish clear matt
- Wood glue
- Wood stain
Tools:
- Pencil
- Ruler
- Rubber
- Measuring tape
- Drill
- Drill bits
- Scrap wood
- Saw
- Hacksaw
- Sander /sandpaper
- String
- Permanent marker
- Masking tape (optional)
- Paint (optional)
- Engraver (optional)
Preparing the wood
- Measure five equal lengths on the wooden-boards (minimum length: 44cm, and width: 6.5cm each), cut and sand-down the edges.
- If the surface of the wood is rough, smooth with sandpaper.
- These will make the top of the bench/small table.
- Measure two equal lengths on the wooden-boards (minimum length: 30.5cm, and width: 6.5cm each), cut and then sand-down the edges. These will act as support struts and go across the width of the five boards (see step 1).
- With the 4×4 timber – measure out four equal lengths (minimum length: 35cm) and cut.
- Sand down the edges, and round the corners along the full length of the wood. If the surface of the wood is also rough; smooth with sandpaper.
Before drilling, you want to test the size of the drill-bit is correct (it should match the width of the dowel you’re using), this is best tested using some scrap-wood. The dowel should go easily enough into the hole (maybe with a little tap from a hammer), but should be hard to pull out. If the dowel is too loose then the drill-bit is too big, too tight and the drill-bit is too small.
You’ll be changing the size of the dowels in this build, therefore check you have the right drill-bit each time.
Dandelion-Leaf Pattern:
It is best to add the pattern to the legs prior to assembly:
- In pencil, draw the silhouette of dandelion leaves on the legs (make sure each leaf is facing upwards, and towards where the top will be).
- Optional: using an engraver, engrave along the pencil lines.
- Using a fine permanent marker, mark along the pencil lines/engraved lines.
You can also do the dandelion pattern on the wooden-boards, for the top of the bench/table before attaching (don’t do the wooden support struts). If you decide to do the decoration before completion, you must make sure to keep the correct order when constructing, otherwise you’ll lose your dandelion pattern, and will have a more abstract one instead. The guide to the dandelion pattern can be found after construction (see below).
Construction:
- Take the five equal length wooden-boards (which will make the top) and line them side-by-side (along their lengths) to ensure they align. Then, taking some string, bind these boards tightly in place:

- Next, take the two support struts and put them at either end of the five wooden-boards, making sure to go across their widths. Check they’re of equal distance from the edges; a minimum of 2cms from the end width of the boards and about 1cm from the edge of the lengths.
- Using a pencil, mark around the support struts
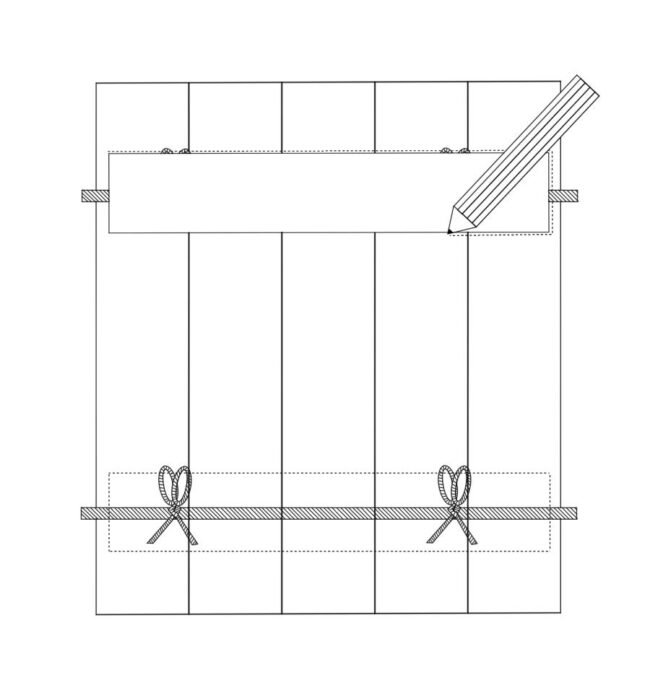
- On each support strut, draw two pencil lines going along the full length of each side, and about 1-1.5cms away from the edge.
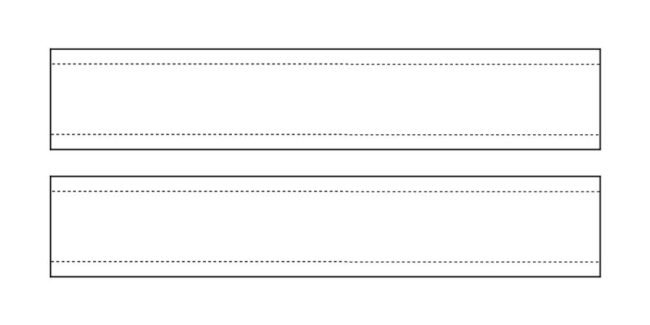
- Keeping the pencilled lines facing upwards, put the support struts back onto the wooden-boards and inside their outlines.
- On each support strut, put a pencil mark in the centre of each wooden-board and along each line (making 10 marks per support strut). These marks will be used to drill holes for the smaller dowels (6x30mm)
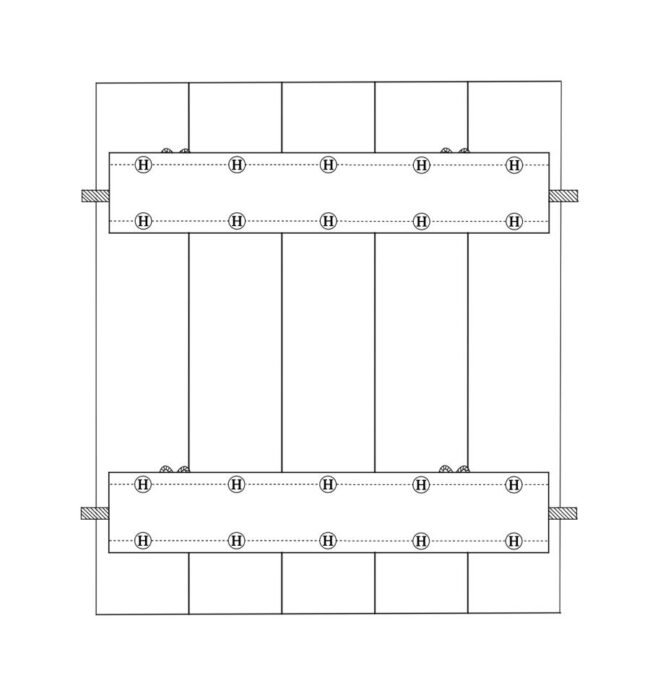
- Load your smaller drill bit (for the 6mm dowels) into your drill, we suggest a 6mm drill bit.
- Helpful hint: Using a short strip of masking tape, wrap the tape 2.5cms away from the end. This is so the first 2.5cm of the drill bit is exposed.
- Now, holding the support strut tightly in place, drill through these each of these marked holes, straight through the support strut and partly into the wooden-boards, slightly over 2/3rds of the way in total (or up to the masking tape). Do this for both support struts.
- When all the holes are made, cut off the string, making sure you keep the wooden-boards in order (this is to ensure the holes align, and if you’ve already done your pattern – that you keep your decoration).
- Holding the support strut down tightly, gently hammer a dowel (6x30mm) through the centre holes and partly into the middle wooden-board.
- Note: The dowels maybe left sticking out, but that’s okay for now.

- Place dowels (6x30mm) into the remaining holes and straight through the support struts and into the wooden-boards. Again, a little bit of each dowel may be exposed.
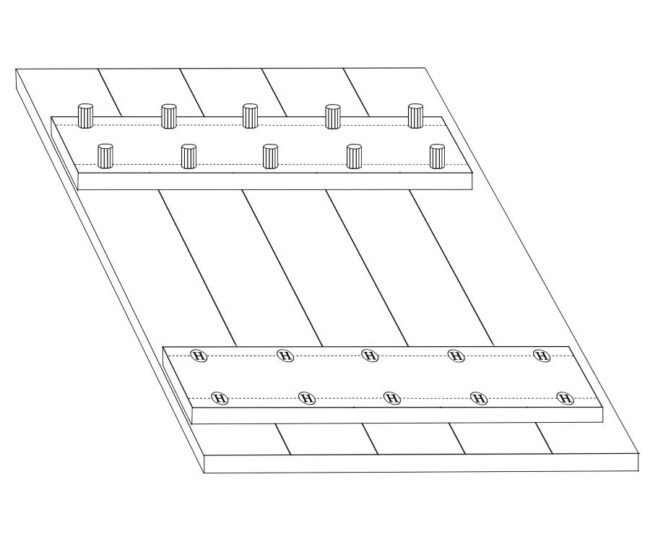
- Repeat steps 6-7 for the other support strut.
- Using a hacksaw, cut the excess length off the dowels. Sand-down for a smooth finish. If you have a sander, you can just forgo the hacksaw.
- Rub out any exposed pencil lines.
- Next, we’ll do the legs. To do this you need to ensure the top and bottom of the legs are perfectly flat, otherwise it will sit wonky. These legs will attach to the support struts’ corners.
- First, you need to mark an outline for the base of the legs onto the support struts – as this is where they’ll attach to. To do this take the width of the support strut and minus the width of the leg, then divide the remainder in two. This final figure, gives the distance from the edges of the support strut. Using our recommended sizing: 6.5cm – 4cm = 2.5cm/2 = 1.25cm. So, you would measure 1.25cms from the support strut’s sides.

- You should now have the outline for three sides of the legs. Use this to complete the square, which should measure 4x4cm. Do this for each corner.

- Within this square; mark four (equally distanced) holes for the dowels. Make sure they’re not too close to the dowels already in place, the marked outline or each other. Do this for each square.
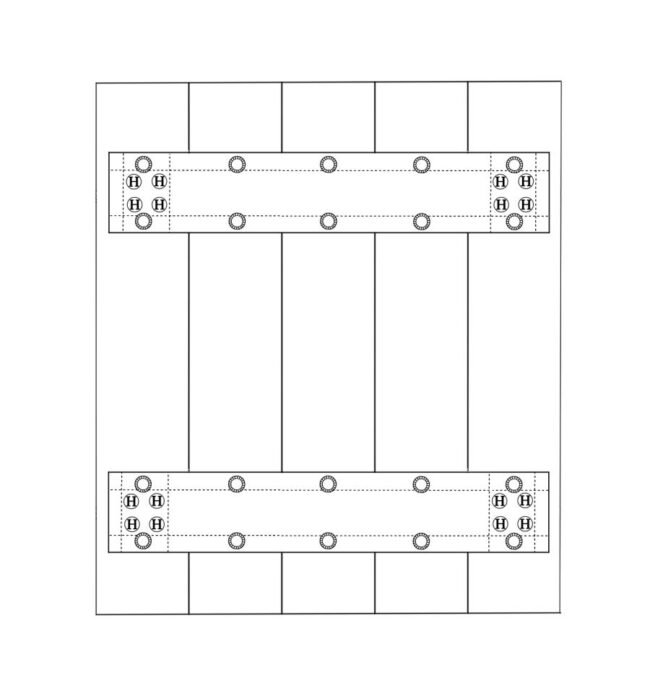
- Load your larger drill bit (for the 8x40mm dowels) into the drill, we suggest an 8mm drill bit.
- Helpful hint: Using a short strip of masking tape, this time wrap the tape 2cms away from the end. This is so the first 2cm of the drill bit is exposed.
- Using the larger dowels (8x40mm) drill slowly through the support struts and part-way into the wooden-boards. Hammer in the dowels – in the end about 1/2 of the dowel should be showing. Repeat this for all 16 marked holes.
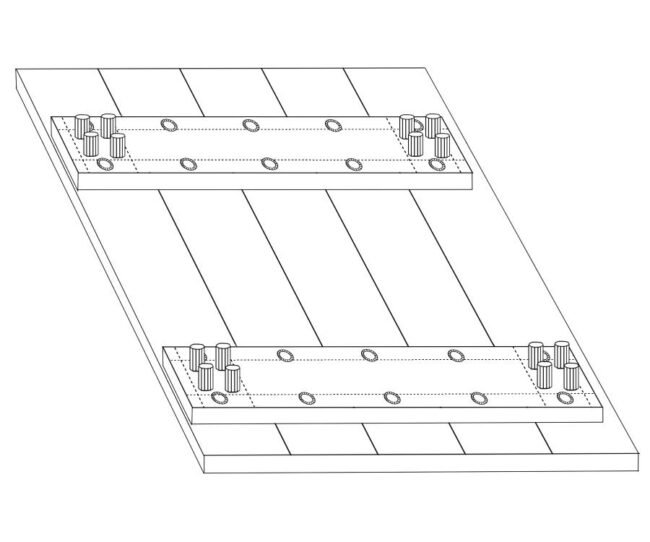
- Measure the placement of these dowels and mark their position on each of the corresponding legs. Before drilling, double check the dowels and marked holes align. A helpful tip is to put paint on the end of the dowels, so when you line the legs and the dowels together, you’ll be able to see if the paint lines up with the pencil-marked holes, if not amend accordingly.

- Drill into the marked holes on the legs – going only slightly deeper than length of the exposed dowel.
- Starting with one leg; put wood-glue on the end of the dowels, and gently hammer the leg in place (put a cloth between the wood and the hammer to prevent denting).
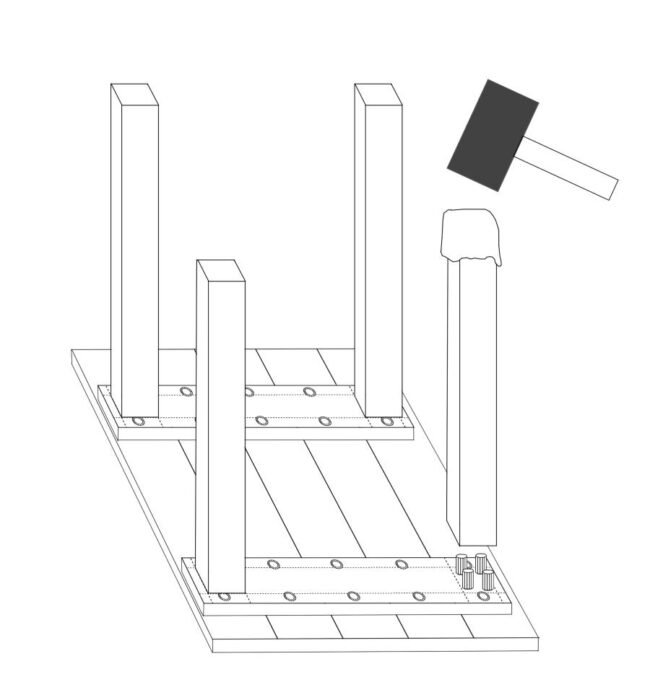
- Repeat with all the legs and leave to dry.
- Optional: Complete the dandelion pattern.
- Optional: Take a wood stain (slightly darker than the natural colour of the wood) and apply this to the legs, whilst leaving the top plain – much like the white dandelion heads.
- Apply three to four coats of polyurethane varnish (depending on the thickness you’ve applied) across the entire table, including the legs. Allow the varnish to dry between layers – thinner layers will dry quicker. The varnish will help protect it against the elements, should you put it outside.
You now have a complete child’s table/small bench.
Dandelion pattern:
- On the wooden-boards draw several slightly wavey lines, going up and across the width of the boards – these will act as dandelion stems. Have a couple of the “stems” cross-over, and then at the top of each one draw a small scruffy ball.
- From this ball decide if the dandelion will be complete, or partially blown away. For a more complete dandelion, a circle outline can help act as a guide – draw short lines of various lengths coming out from the scruffy ball, but not exceeding the circle outline. At the end of each line draw a wide v:
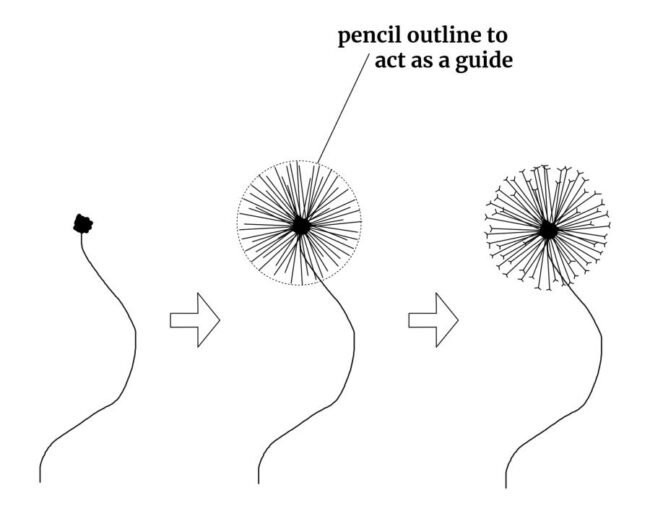
- Once complete rub out the circle outline.
- Where there are incomplete dandelion’s, repeat step 2, but don’t draw seeds all the way around, and instead have some floating away. In addition, have some of these floating seeds clustered together. Draw the seeds going up to a single top corner, as if they’re caught in the breeze.
- Once the pattern is done, you can either; engrave along the pencil marks and fill this in with a permanent marker, or just use a permanent maker alone. In this example I did both.
Whether a child’s bench or a table. I hope this guide has come in handy.
Have your own DIY guide? We’d love to hear from you. Please send us your step-by-step creation through our submissions page.

