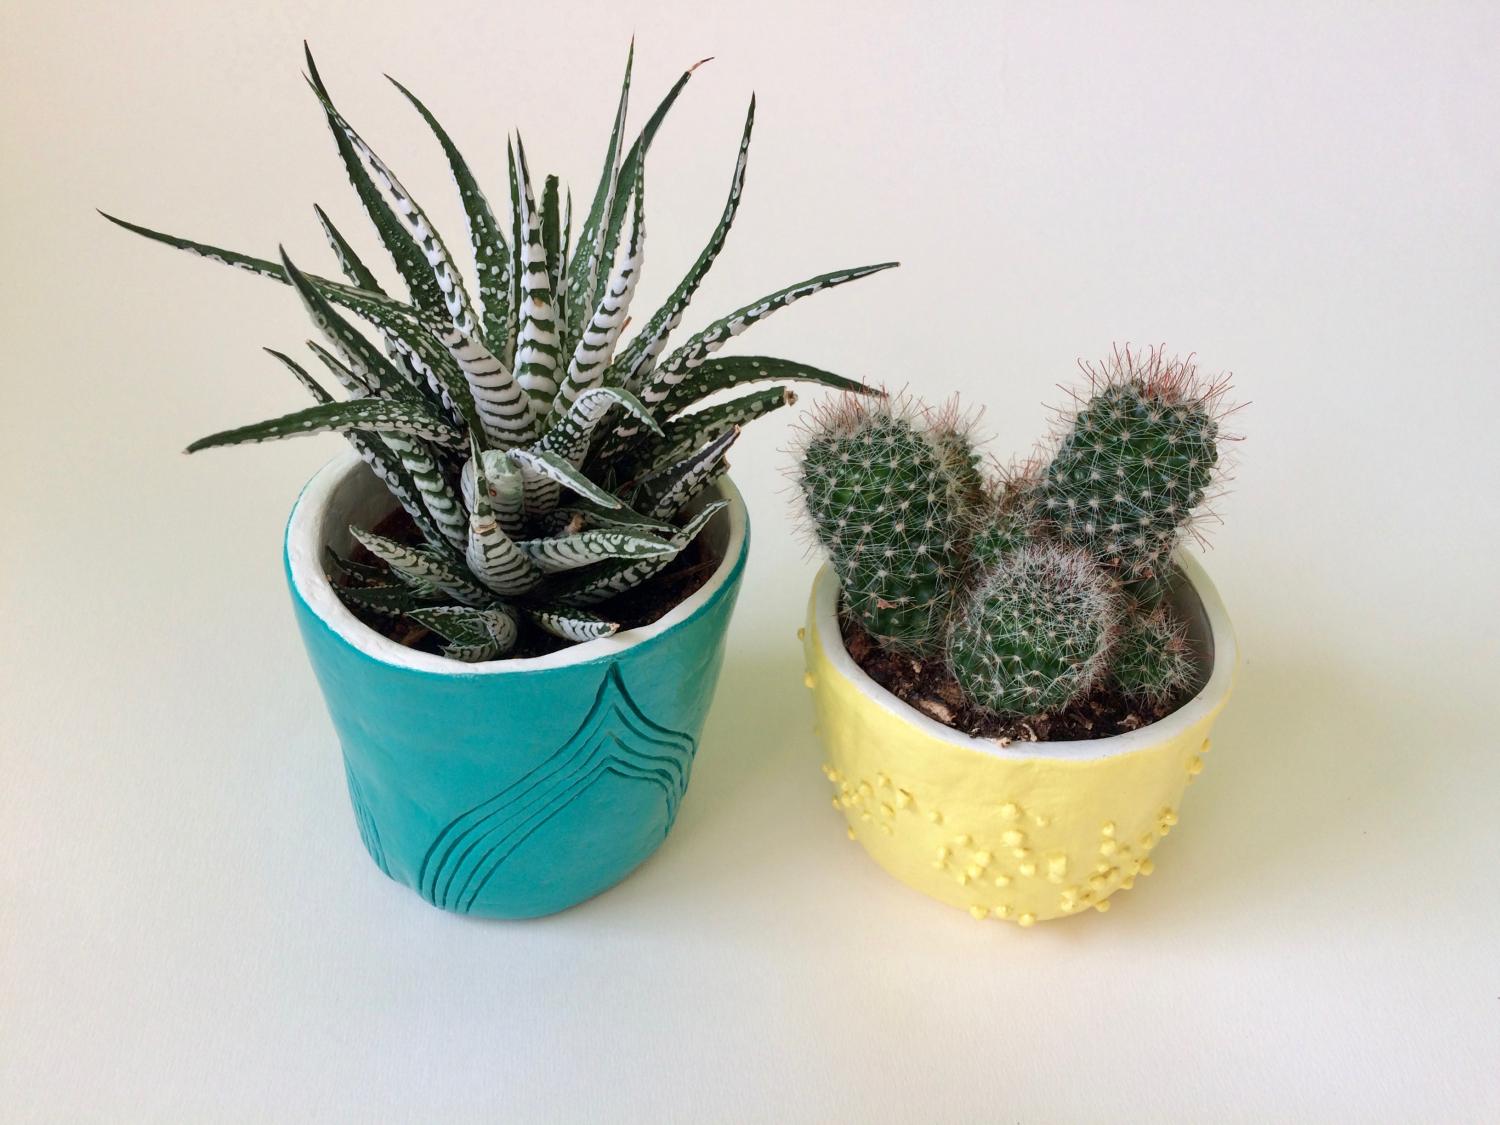
It’s time to be green-fingered and brighten up your rooms. Make a statement and draw guests to those spiky succulents and flowery florals, thanks to these plant-pots.
Level of difficulty: Medium
Materials:
- 1kg white air-dry clay (makes 2-3 plant-pots)
- Acrylic paints
- Water
- Plastic pot (for the mould)
- Paper
- Gloss varnish
- Waterproof agent
- Polyurethane gloss varnish
If you don’t use white clay, you’ll need to undercoat the clay (once dry) in either white primer or acrylic.
Tools:
- Paintbrushes
- Ruler
- Rolling pin
- Craft knife
- Pencil
- Sandpaper
Making the basic structure for a plant pot:
When shaping, always keep your clay moist by sprinkling on a bit of water.
Warning: although this will advise how to make a plant-pot from air-dry clay as waterproof as possible, you’re still best to use a sealed pot within the final design.
- Knead the clay into a large ball
- Using the rolling pin, roll out the clay to a depth of 1cm
- Select a plastic pot to mould your clay plant-pot around. Wrap the pot’s outside in cling film. This is to help prevent it from sticking to the clay.
- Next, turn the pot upside down and drape the clay over the base of the plastic mould, and around the sides.
- The clay will fold and pleat in places – push and smooth this flat around the pot to evenly distribute the clay. If you trim or cut off the excess instead, you risk making a join in the clay which is partial to breaking. You also want to keep the depth reasonably thick.
- Wet the sides of the clay pot, and then using a ruler – run it along the length and height of the pot – this helps to create a smooth outside.
- Choose the height you want your clay plant-pot to be (remember you want it higher than the sealed pot you’ll use inside), and don’t forget to measure from the inside out. Once you’re happy with your chosen height – trim off the excess clay, but be careful not to cut into the plastic mould below.
- Now to the designs:
Doing your own design:
If you’re doing your own design, which is more than cool, you’re best to carve or add more clay while the clay pot is still wet.
Leave the pot to dry for half a day, and then carefully wiggle out the plastic mould and remove any cling film. Leave another 2-3 days for drying. When decorating, you might need to use multiple layers of paint for it to really stand out, and to hide any brushstrokes.
To waterproof the pots, put waterproofing agent on the inside, and once dry, put varnish both on the inside and outside of the pot. However, as mentioned it’s air-dry clay and though these measures should stop water, it’s still best to use a sealed pot inside.
You should now have your finished pot.
THE DESIGNS:
Pin-headed:
- As the name probably gives away, you’ll first need to make multiple balls the size of a pin head – how many is up to you.
- To attach the balls to the clay pot – this is the tricky part – use the tip of craft knife to push around the edges of the ball and to smooth into the pot. This will leave you with a slightly smaller ball sticking out. Keep repeating till happy with the design.
- Leave the clay pot to dry for 6-8 hours
- Then gently twist and pull the plastic mould away from the plant-pot, and remove any cling film
- Leave to dry, I recommend at least two days
- Sand down any rough edges or bumps
- Paint the inside of the pot with white acrylic – will cause a great contrast to the outside colour. To avoid brushstrokes, water the paint down a little. Will need roughly 2-3 coats.
- Painting the outside of the pot. In this case I used a light-yellow acrylic, and put on 4-5 layers to create a whole block colour, and to hide any brushstrokes.
- Leave the paint to dry for a day. Then apply a waterproofing agent on the inside of the pot. Leave another day for this to dry.
- Apply gloss varnish to the inside and outside of the pot, may need 2-3 layers, and leave 8-12 hours between coats.
Complete
Engraved arches:
- Take a piece of paper and cut this to be the height of the plant-pot, and no more than half its width. Then fold the paper in half, before unfolding.
- Starting from the top of the fold line, draw a wave that slowly widens out to the bottom of the paper. Cut along the wave.
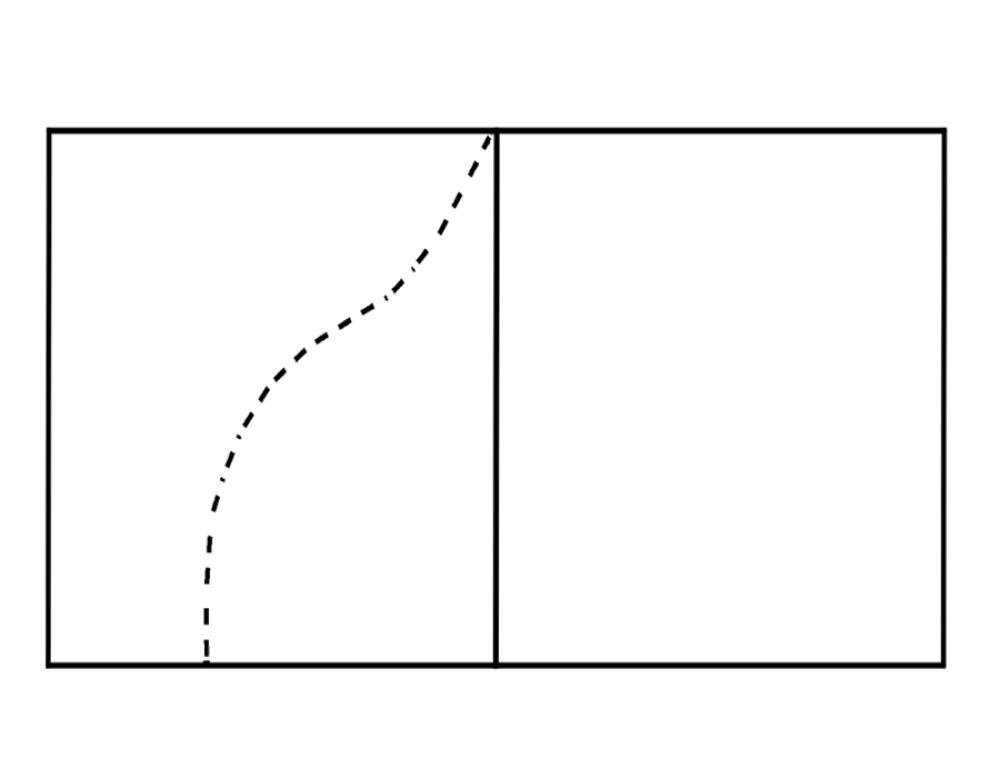
Then folding the paper back along it’s crease line, draw around the wave.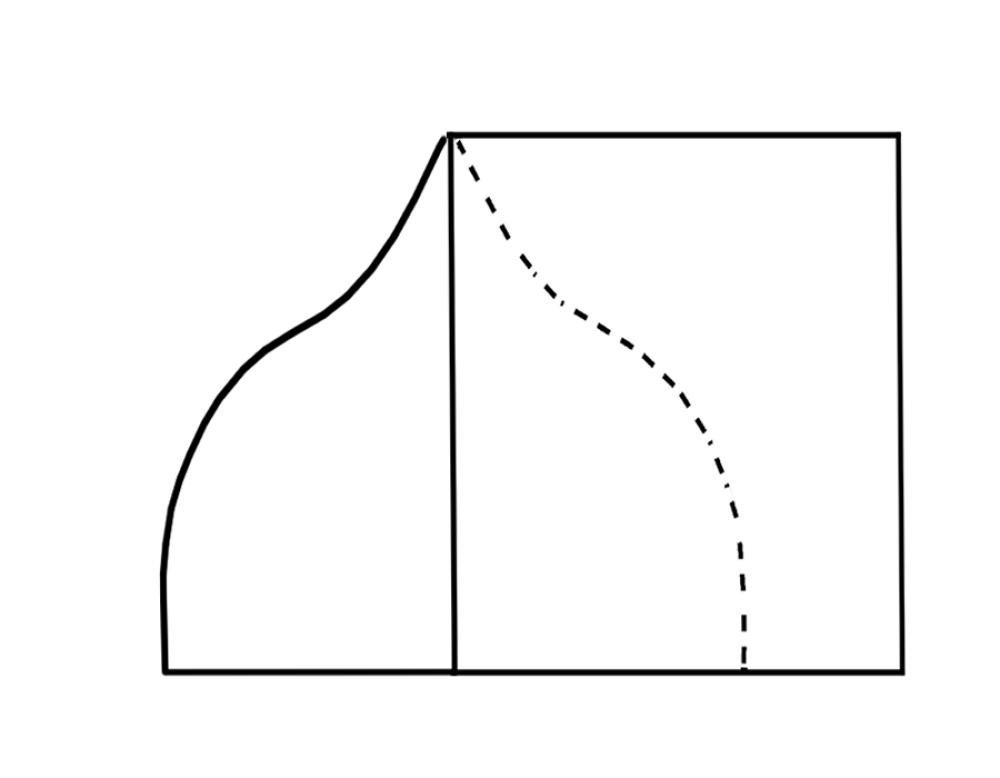
Then cut this half of the wave out as well. You should now have a symmetrically arched template.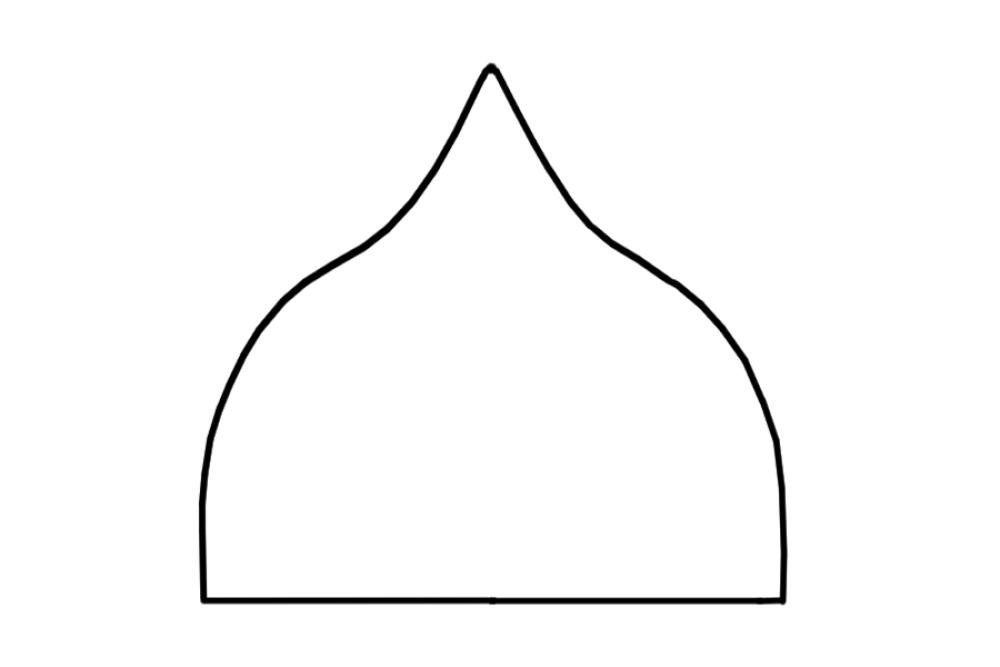
- Next, work out how many of these arches you want, and where to place them – you want them evenly distributed, otherwise you’ll end up with overlapping or scrunched-up arches.
- Having decided where you want your first arch; place the paper template against the plant-pot, and lightly “engrave” around its outline. You don’t want to go very deep, otherwise you’ll weaken the plant-pot.
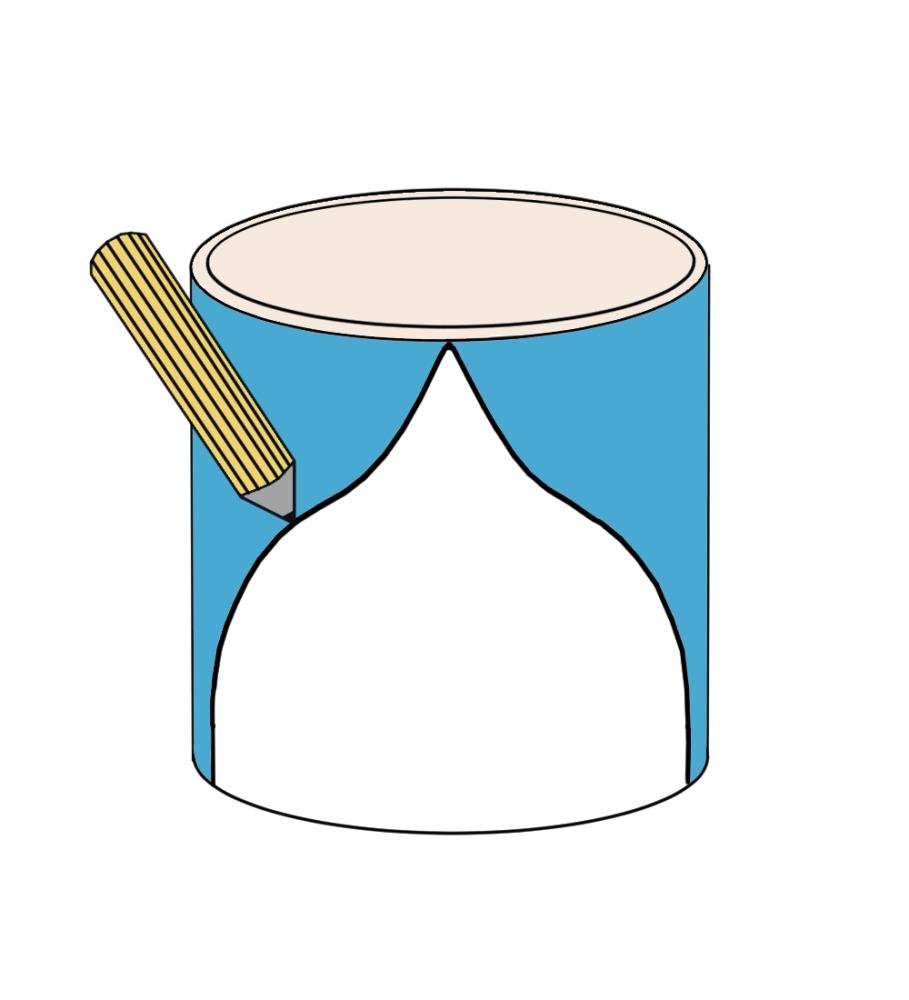
- Then, taking away the template, “engrave” another arch just a couple of mms from its inside – making sure to following its pattern.
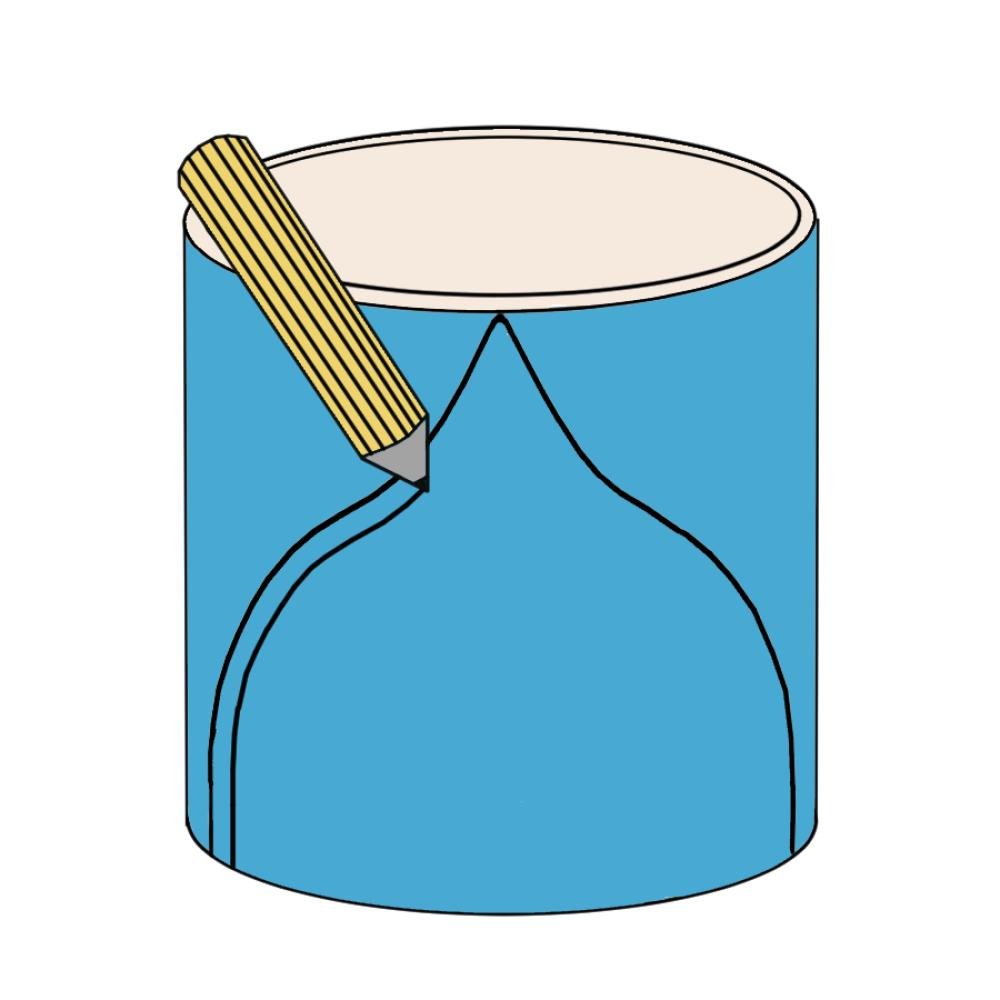
Keep doing another arch within another, until you’re happy. In this example I did four arches.
- Once all the “engraved” arches are done, leave the clay-pot to partially set for 6-8 hours.
- Then gently twist and pull the plastic mould out from clay-pot.
- To make the pot extra strong; knead and roll out a large amount of clay to a few millimetres in depth. From this, cut out a long rectangle the height and circumference of the plant-pot. Wet the inside of the plant-pot and lay the rectangle around its inside.
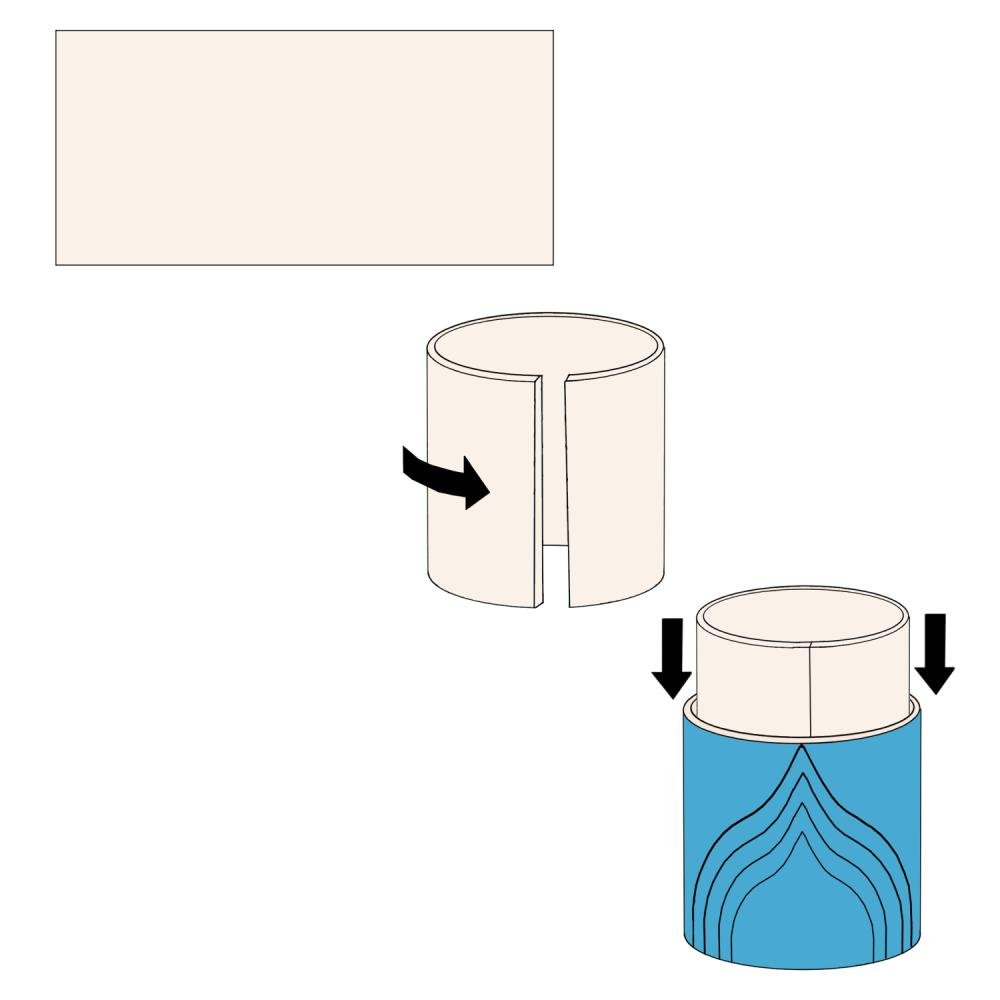
Pushing the two together. This is a preventative measure in case your engraved arches have gone in too deeply, and will help to re-strengthen the pot.
- Leave 2-3 days to dry.
- Once dry, sand down any uneven surfaces.
- Paint the inside of the pot with white acrylic – which causes a great contrast to the outside colour. To avoid brushstrokes, water the paint down a little. Will need 2-3 coats.
- Paint the outside of the pot in whichever colour you choose. Here I mixed cerulean (light blue) and viridian (medium green) in equal measure. Add a little water to the acrylic paint to reduce thick brushstrokes. You’ll need to do 4-5 layers till you get an even colour.
- Once the paint is dry (I suggest leaving it at least a day), apply a waterproof agent on the inside of the pot. Leave to dry.
- Then apply gloss varnish to the inside and outside of the pot – you may need to do 2-3 layers (leave 8-12 hours between coats).
Your striking plant-pot is now complete!

